UIViewController Autolayout and Timers in iOS for Workout app flow
<Image alt="Apache Spark" objectFit="cover" src="/static/images/7min22.png" height={350} width={1000} placeholder="blur" quality={100} />
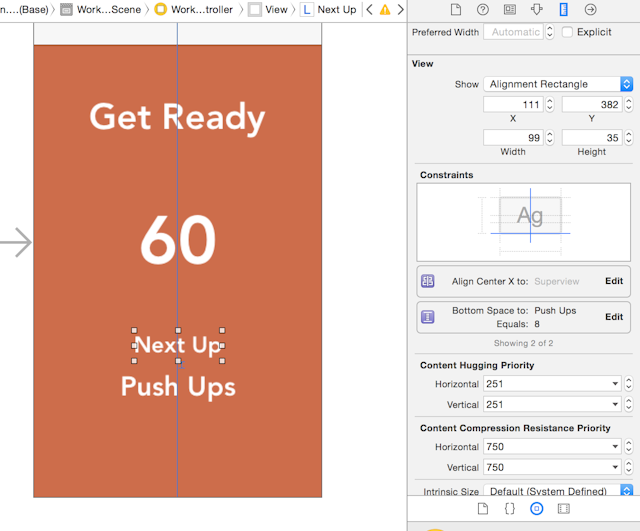
In this post we will learn how to use UIViewController autolayout and Timers to create workflow for our workout app.
In previous post we learned about UITableview Datasource and Delegates
Create a new file called WorkoutViewController which subclasses UIViewController.swift. In the WorkoutViewcontroller we will cycle through a list of all the available workouts. The main components in the UIViewcontroller is MZTimerLabel which will tell how many seconds are left for this workout. IF you don't want to use this method you could as well use the UILabel and NSTimer
In viewDidLoad we will set the timeFormat and also create multiple IBOutlet for the nextUp, workoutLabel, mainLabel and the timerLabel.
Also set the initial Count DownTimer for 10 second and update the nextUp workout. We will have a 10second rest after every workout which we can control using the index variable. When the index is even we show the rest message and when the index is odd we show the workout information.
MZTimerLabel also has a delegate method which will be called when the count down timer reaches 0. Lets reset the timer and increment the index.
//
//  WorkoutViewController.swift
//  SevenMinWorkOut
//
//  Created by Shrikar Archak on 4/18/15.
//  Copyright (c) 2015 Shrikar Archak. All rights reserved.
//

import UIKit

class WorkoutViewController: UIViewController, MZTimerLabelDelegate {

    @IBOutlet weak var nextUp: UILabel!
    @IBOutlet weak var workoutLabel: UILabel!
    @IBOutlet weak var mainLabel: UILabel!
    @IBOutlet weak var timerLabel: MZTimerLabel!

    let restTime = 11.0
    let workoutTime = 30.0
    var index = 5;
    let dataSource = WorkoutDataSource()
    var workouts: [Workout]!
    override func viewDidLoad() {
        super.viewDidLoad()
        timerLabel.delegate = self
        timerLabel.timerType = MZTimerLabelTypeTimer
        timerLabel.setCountDownTime(10)
        timerLabel.timeFormat = "ss"
        timerLabel.resetTimerAfterFinish = true
        timerLabel.start()
        workouts = dataSource.getWorkOuts()
        workoutLabel.text = workouts[0].title
        self.navigationController?.navigationBar.barTintColor = workouts[0].color
        self.navigationController?.navigationBar.titleTextAttributes = [NSForegroundColorAttributeName: UIColor.whiteColor()]

    }

    override func didReceiveMemoryWarning() {
        super.didReceiveMemoryWarning()
    }

    func timerLabel(timerLabel: MZTimerLabel!, finshedCountDownTimerWithTime countTime: NSTimeInterval) {

        if index % 2 == 0 {
            let wk = workouts[index / 2]
            timerLabel.text = "(workoutTime)"
            mainLabel.text = wk.title
            self.view.backgroundColor = wk.color
            timerLabel.setCountDownTime(workoutTime);
            workoutLabel.text = "Rest !!"
            self.navigationController?.navigationBar.barTintColor = wk.color
        } else {
            let wk = workouts[index / 2 + 1]
            timerLabel.text = "(restTime)"
            mainLabel.text = "Rest !!"
            self.view.backgroundColor = wk.color
            timerLabel.setCountDownTime(restTime);
            workoutLabel.text = wk.title
            self.navigationController?.navigationBar.barTintColor = wk.color
        }

        index++;
        if !((index / 2) > workouts.count) {
            timerLabel.start()
        } else {
            println("Workout done")
        }
    }

}
Last but not the least CTRL+DRAG from the start workout button on to the navigation controller embedding Workoutviewcontroller.swift and select Modal style. 
Go ahead and run the application . Congratulation! you have build one of the heavily used iOS app in the app store.