Setting up Apple pay in your Swift App
In the last part of the tutorial we will learn how to use Apple pay to buy items in our SellAnything app. We will look at how to setup Apple pay using Stripe and will get to the point where we can send token to our server and charge the card.
Prerequisites
- Registering for an Apple Merchant ID
- Creating a new Apple Pay certificate
- Integrating with Xcode
I have followed the exact steps mentioned in these document Stripe and Apple pay documents and they have worked perfectly well for me. So please go ahead and complete the prerequisites
Many people keep getting confused as to when we should be using In App purchases and when to use Apple pay. The key difference is that any thing digital which you sell inside the app needs to be using In App purchases. If you are selling any physical products like tickets, uber, event tickets etc can use Apple pay.
Creating a payment request
Payment requests are instances of the <Link href="https://developer.apple.com/library/ios/documentation/PassKit/Reference/PKPaymentRequest_Ref/index.html#//apple_ref/occ/cl/PKPaymentRequest" color="blue.500" fontWeight="bold">PKPaymentRequest class </Link> A payment request consists of a list of summary items that describe to the user what is being paid for, a list of available shipping methods, a description of what shipping information the user needs to provide, and information about the merchant and payment processor.
PaymentRequest include currency, region information and merchant identifier.
request.currencyCode = @"USD";request.countryCode = @"US";request.merchantIdentifier = @"merchant.com.example";
PKPaymentRequest also an array of PKPaymentSummaryItem objects that summarize the amount of the payment.
Apple Pay uses the last item in the paymentSummaryItems array as the grand total for this purchase. The PKPaymentAuthorizationViewController class displays this item differently than the rest of the summary items. As a result, there are additional requirements placed on both its amount and its label.
- Set the grand total amount to the sum of all the other items in the array. This amount must be greater than zero.
- Set the grand total label to the name of your company. This label is used to represent the person or company being paid.
- Your payment processor might have additional requirements, such as a minimum or maximum payment amount.
Lets see an example of how to do this
    func buyTapped(cell: TableViewCell) {
        let indexPath = self.tableView.indexPathForCell(cell)! as NSIndexPath
        let item = self.items!\[indexPath.row\]
        currItem = item
        let paymentNetworks = \[PKPaymentNetworkAmex, PKPaymentNetworkMasterCard, PKPaymentNetworkVisa\]
        if PKPaymentAuthorizationViewController.canMakePaymentsUsingNetworks(paymentNetworks) {

            print("Apple pay is available")

            request.supportedNetworks = \[PKPaymentNetworkAmex, PKPaymentNetworkMasterCard, PKPaymentNetworkVisa\]
            request.countryCode = "US"
            request.currencyCode = "USD"
            request.merchantIdentifier = "merchant.com.shrikar.sellanything"
            request.merchantCapabilities = .Capability3DS
            request.requiredShippingAddressFields = PKAddressField.PostalAddress
            request.paymentSummaryItems = getPayments(item, shipping: "9.99")

            let sameday = PKShippingMethod(label: "Same Day", amount: NSDecimalNumber(string: "9.99"))
            sameday.detail = "Guranteed Same day"
            sameday.identifier = "sameday"

            let twoday = PKShippingMethod(label: "Two Day", amount: NSDecimalNumber(string: "4.99"))
            twoday.detail = "2 Day delivery"
            twoday.identifier = "2day"

            let shippingMethods : \[PKShippingMethod\] = \[sameday, twoday\]
            request.shippingMethods = shippingMethods

            viewController = PKPaymentAuthorizationViewController(paymentRequest: request)
            viewController?.delegate = self
            presentViewController(viewController!, animated: true, completion: nil)

        }
    }
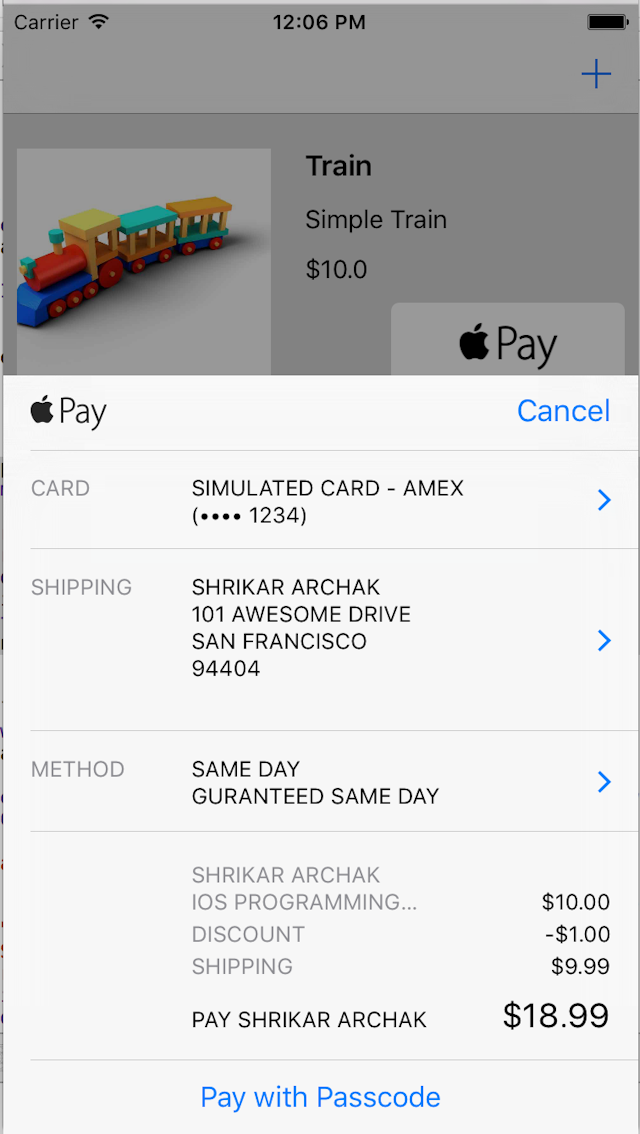
In the simple form we first check if the apple pay is available. Once we figure that apple pay is available we set the available networks , country code and the currencyCode. The merchant identifier is the one you created before. Also the if we need shippingAddress for shipping the physical items we can set the requiredShippingAddressFields to PKAddressField.PostalAddress.
Next is paymentSummaryItems which is a list of these items : initial price, any discount, shipping and the total for that item. Also if you want to provide different shippingMethods we can provide it as the available shippingMethods and then calculate the total price accordingly.
After we setup all the necessary field we set the PKPaymentAuthorizationViewController delegate to self and then present the view controller.
We will be receiving the callback when they select the shipping methods, authorize payment and when the authorization is complete. At this point we should be able to update our charges accordingly.
func getPayments(item : Item, shipping: String) -> \[PKPaymentSummaryItem\] {
        let wax = PKPaymentSummaryItem(label: "Shrikar Archak iOS programming : \\(item.price)", amount: NSDecimalNumber(string: "\\(item.price)"))
        let discount = PKPaymentSummaryItem(label: "Discount", amount: NSDecimalNumber(string: "-1.00"))
        let shipping = PKPaymentSummaryItem(label: "Shipping", amount: NSDecimalNumber(string: shipping))
        let totalAmount = wax.amount.decimalNumberByAdding(discount.amount)
            .decimalNumberByAdding(shipping.amount)
        let total = PKPaymentSummaryItem(label: "Shrikar Archak", amount: totalAmount)
        return \[wax, discount, shipping, total\]
    }

    func paymentAuthorizationViewController(controller: PKPaymentAuthorizationViewController, didSelectShippingMethod shippingMethod: PKShippingMethod, completion: (PKPaymentAuthorizationStatus, \[PKPaymentSummaryItem\]) -> Void) {
        completion(PKPaymentAuthorizationStatus.Success, getPayments(currItem, shipping: "\\(shippingMethod.amount)"))
    }

    func paymentAuthorizationViewController(controller: PKPaymentAuthorizationViewController, didAuthorizePayment payment: PKPayment, completion: (PKPaymentAuthorizationStatus) -> Void) {

        print("Did authorize : \\(payment)")
        completion(PKPaymentAuthorizationStatus.Success)
    }

    func paymentAuthorizationViewControllerDidFinish(controller: PKPaymentAuthorizationViewController) {
        print("Did finish")
        controller.dismissViewControllerAnimated(true , completion: nil)
    }
In the Did Authorize payment is where we can make a request to a payment server to handle the charges. Example any server which can charge the token provided in the PKPayment to Stripe or any other alternative.
<Link href='https://github.com/sarchak/SellAnything' color="blue.500" fontWeight="bold">Complete code is available on github</Link>