IOS8 Cloudkit Tutorial - Part 1
<Image alt="IOS8 Cloudkit Tutorial - Part 1" objectFit="contain" src="/static/images/cloudkit5.png" height={350} width={1000} placeholder="blur" quality={100} />
In this iOS8 CloudKit tutorial we will create an iOS app that will store a simple text in icloud using CloudKit technology released for iOS8.
What we will cover
- Creating a new project.
- CloudKit Configuration
- CloudKit Terminologies
- Schema design in Cloudkit Dashboard
- CloudKit Workflow
- Save records in iCloud Storage.
CloudKit helps your to move structured data between your app and iCloud.
Creating a new project
- Open Xcode
- File > New Project > Single Page Application
- ProductName : CloudKit
- Language : Swift
- Device : Iphone
- Next and save the project
CloudKit Configuration
Click on the target and make sure we have configured our app for iCloud.
<Image alt="IOS8 Cloudkit Tutorial - Part 1" objectFit="contain" src="/static/images/cloudkit1.png" height={350} width={1000} placeholder="blur" quality={100} />
<Image alt="IOS8 Cloudkit Tutorial - Part 1" objectFit="contain" src="/static/images/cloudkit2.png" height={350} width={1000} placeholder="blur" quality={100} />
CloudKit Terminologies
- CKContainer represents a namespace for your app. If your account has 2 different apps then there will be 2 container one for each app.
- Container is divided into 2 databases : public and private database(CKDatabase). Data stored in the private database is only accessible to the current user and in their user’s icloud account. Public Database is accessible as readonly to all people who are not logged in using iCloud account.
- Record Type is a schema for the objects that are stored in icloud.( Think class in OOP terms)
- CKRecord is an instance of the record type (Think objects in OOP terms) and contains key value pairs which represent the object.
Schema Design
- login to cloudkit dashboard
- Create a new Record Type called Todos. Our example we will just have one field todotext which will be of type text. <Image alt="IOS8 Cloudkit Tutorial - Part 1" objectFit="contain" src="/static/images/cloudkit3.png" height={350} width={1000} placeholder="blur" quality={100} />
<Image alt="IOS8 Cloudkit Tutorial - Part 1" objectFit="contain" src="/static/images/cloudkit4.png" height={350} width={1000} placeholder="blur" quality={100} />
CloudKit Workflow
- Get current container
- Get the CKDatabase object that corresponds to the database (public or private) that contains the records.
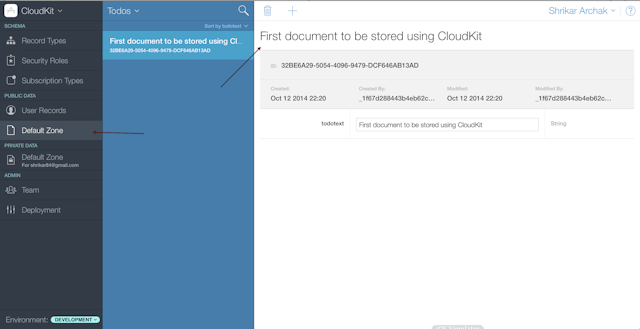
- After storing the data you can find them in cloudkit dashboard -> Public Data -> default zone
import Foundation
import CloudKit

class CloudKitHelper {
    var container : CKContainer
    var publicDB : CKDatabase
    let privateDB : CKDatabase

    init() {
        container = CKContainer.defaultContainer()
        publicDB = container.publicCloudDatabase
        privateDB = container.privateCloudDatabase
    }

    func saveRecord(todo : NSString) {
        let todoRecord = CKRecord(recordType: "Todos")
        todoRecord.setValue(todo, forKey: "todotext")
        publicDB.saveRecord(todoRecord, completionHandler: { (record, error) -> Void in
            NSLog("Saved to cloud kit")

        })

    }
}
Run the project in Simulator
If you get an error like this or the data is not stored in iCloud.
Some error you might face : Not Authenticated” (9/1002); “This request requires an authenticated account
Make sure you are logged into icloud in the icloud simulator.
Settings -> icloud -> login
Enter some text in the textfield and save to CloudKit. Go to icloud dashboard to see if the data is stored properly.
<Image alt="IOS8 Cloudkit Tutorial - Part 1" objectFit="contain" src="/static/images/cloudkit5.png" height={350} width={1000} placeholder="blur" quality={100} />
In the next part we will see how we can fetch the data from icloud using CloudKit. Let me know if you have any comments in the section below. Find more information about Part 2 here