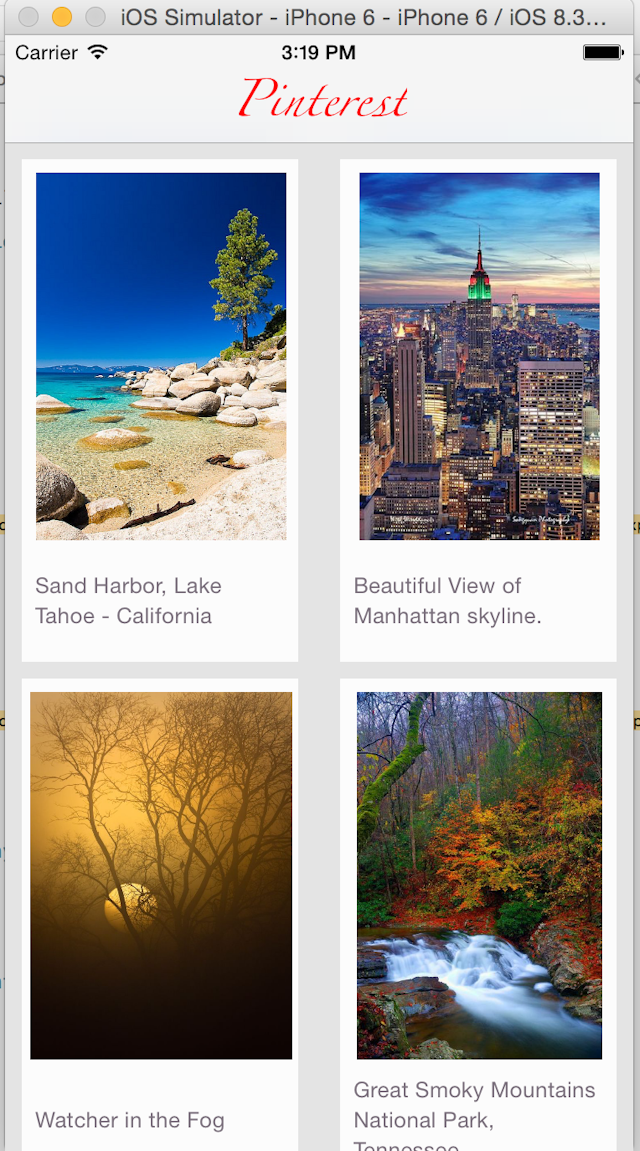
iOS Swift Tutorial : UICollectionView Pinterest Layout
<Image alt="iOS Swift Tutorial : UICollectionView Pinterest Layout" objectFit="contain" src="/static/images/Screen-Shot-2015-05-02-at-3.19.27-PM.png" height={350} width={1000} placeholder="blur" quality={100} />
Agenda
In this iOS Swift tutorial we will learn how to build a pinterest layout using UICollectionView.
- Introduction to UICollectionView
- UICollectionViewDataSource
- UICollectionViewDelegate
- UICollectionViewFlowLayout
- Example : Pinterest like layout
Introduction to UICollectionView
Collection View is a way to present a collection of data objects/items in a flexible layout. If you ever want to represent items in rows and columns you have found what you were looking for. UICollectionView provides the infrastructure / api’s for implementing these simple grid layouts or any other custom layouts for your app.
Like UITableView , collection views are data oriented objects and manage the visual presentation of the data driven views.
UICollection view is a subclass of UIScrollView
UICollectionViewDataSource
Like UITableView we need to implement the data source protocol which in collectionView’s context is UICollectionViewDataSource. The data source manages the content of the collection view and create the views needed to present the content.
Apple’s documentation : Every collection view must have a data source object. The data source object is the content that your app displays. It could be an object from your app’s data model, or it could be the view controller that manages the collection view. The only requirement of the data source is that it must be able to provide information that the collection view needs, such as how many items there are and which views to use when displaying those items.
UICollectionViewDelegate
This delegate objects allows us to intercept messages from the collection view and customize the view’s behaviour.
UICollectionViewFlowLayout
UICollectionViewLayout is the interface and UICollectionViewFlowLayout is a concrete object which implements UICollectionViewLayout. UICollectionViewFlowLayout organizes the items into grids from one row or column to next depending on the scroll direction.
Pinterest layout using UICollectionView
-
First Create a single view application
-
Delete all the contents from the storyboard
-
Drag a CollectionViewController from the Object Library. Change the background color to #E9E9E9.
<Image alt="iOS Swift Tutorial : UICollectionView Pinterest Layout" objectFit="contain" src="/static/images/coll2.png" height={350} width={1000} placeholder="blur" quality={100} />
-
Select the Attributes inspector with the CollectionViewController selected and then make it as the initialView Controller
<Image alt="iOS Swift Tutorial : UICollectionView Pinterest Layout" objectFit="contain" src="/static/images/coll3.png" height={350} width={1000} placeholder="blur" quality={100} />
-
Edit the UICollectionViewCell to contain an imageView and a label
<Image alt="iOS Swift Tutorial : UICollectionView Pinterest Layout" objectFit="contain" src="/static/images/coll3.png" height={350} width={1000} placeholder="blur" quality={100} />
-
Download an image from pinterest and add it to your image assets
-
Select ImageView and set the image to the one which you just added to your project.
-
Select UICollectionViewController > Editor > Embed in Navigation Controller. At this point this is how your layout should look like <Image alt="iOS Swift Tutorial : UICollectionView Pinterest Layout" objectFit="contain" src="/static/images/coll5.png" height={350} width={1000} placeholder="blur" quality={100} />
If you are interested in learning iOS Development I suggest you take a look at [Building an app every month in 2015]
Now lets create a new file LayoutController which subclasses UICollectionViewController .
//
//  LayoutController.swift
//  PinterestLayout
//
//  Created by Shrikar Archak on 12/21/14.
//  Copyright (c) 2014 Shrikar Archak. All rights reserved.
//

import UIKit

let reuseIdentifier = "collCell"

class LayoutController: UICollectionViewController, UICollectionViewDelegateFlowLayout {
    let sectionInsets = UIEdgeInsets(top: 10.0, left: 10.0, bottom: 10.0, right: 10.0)
    let titles = \["Sand Harbor, Lake Tahoe - California","Beautiful View of Manhattan skyline.","Watcher in the Fog","Great Smoky Mountains National Park, Tennessee","Most beautiful place"\]
    override func viewDidLoad() {
        super.viewDidLoad()
    }

    override func didReceiveMemoryWarning() {
        super.didReceiveMemoryWarning()
        // Dispose of any resources that can be recreated.
    }

    // MARK: UICollectionViewDataSource

    override func numberOfSectionsInCollectionView(collectionView: UICollectionView) -> Int {
        //#warning Incomplete method implementation -- Return the number of sections
        return 1
    }

    override func collectionView(collectionView: UICollectionView, numberOfItemsInSection section: Int) -> Int {
        //#warning Incomplete method implementation -- Return the number of items in the section
        return 50
    }

    override func collectionView(collectionView: UICollectionView, cellForItemAtIndexPath indexPath: NSIndexPath) -> UICollectionViewCell {
        let cell = collectionView.dequeueReusableCellWithReuseIdentifier(reuseIdentifier, forIndexPath: indexPath) as CollectionViewCell
        cell.title.text = self.titles\[indexPath.row % 5\]
        let curr = indexPath.row % 5  + 1
        let imgName = "pin\\(curr).jpg"
        cell.pinImage.image = UIImage(named: imgName)

        return cell
    }

    func collectionView(collectionView: UICollectionView!,
        layout collectionViewLayout: UICollectionViewLayout!,
        sizeForItemAtIndexPath indexPath: NSIndexPath!) -> CGSize {
            return CGSize(width: 170, height: 300)
    }

    func collectionView(collectionView: UICollectionView!,
        layout collectionViewLayout: UICollectionViewLayout!,
        insetForSectionAtIndex section: Int) -> UIEdgeInsets {
            return sectionInsets
    }

}

Also create a new file called CollectionViewCell which subclasses UICollectionViewCell.

//
//  CollectionViewCell.swift
//  PinterestLayout
//
//  Created by Shrikar Archak on 12/21/14.
//  Copyright (c) 2014 Shrikar Archak. All rights reserved.
//

import UIKit

class CollectionViewCell: UICollectionViewCell {
    @IBOutlet weak var title: UILabel!
    @IBOutlet weak var pinImage: UIImageView!
}
At this point open the main storyboard and select the UICollectionViewController and set the class name to LayoutController
<Image alt="iOS Swift Tutorial : UICollectionView Pinterest Layout" objectFit="contain" src="/static/images/coll6.png" height={350} width={1000} placeholder="blur" quality={100} />
Also select the collectionView cell and set the class to CollectionViewCell and the cell identifier to collCell.
Built and Run the project.
<Image alt="iOS Swift Tutorial : UICollectionView Pinterest Layout" objectFit="contain" src="/static/images/pin_vertical.gif" height={350} width={1000} placeholder="blur" quality={100} />
Change the scroll to horizontal and you should get something like this
<Image alt="iOS Swift Tutorial : UICollectionView Pinterest Layout" objectFit="contain" src="/static/images/pin_horizontal.gif" height={350} width={1000} placeholder="blur" quality={100} />
Source code on Github UICollectionView Pinterest Please let me know if you have any questions/feedback.