Core Data Stack: Save and Fetch entities
<Image alt="Core Data" objectFit="cover" src="/static/images/cds1.png" height={350} width={1000} placeholder="blur" quality={100} />
In the previous post we saw how to build a simple Core Data application. Also if you haven’t completed the previous post I would suggest you to look at them before continuing.
- Xcode 6 Tutorial: Designing the iOS app layout for barcode inventory app
- AVFoundation : Implementing barcode scanning in iOS8 with Swift
In this post we will provide users to add inventory and display all the existing inventory. Also the user will be able to scan the barcode and get necessary detail about that product.
The datamodel for the product will look like below.
<Image alt="Core Data" objectFit="cover" src="/static/images/cds3.png" height={350} width={1000} placeholder="blur" quality={100} />
Most of the data in the CoreDataStack is boilerplate code and is automatically generated. The most important function in our case is insertInventory which creates an entity in the managed object context and store it in the core data stack.
//
//  CoreDataStack.swift
//  SimplyBarcode
//
//  Created by Shrikar Archak on 2/8/15.
//  Copyright (c) 2015 Shrikar Archak. All rights reserved.
//

import Foundation
import CoreData

class CoreDataStack {
    lazy var applicationDocumentsDirectory: NSURL = {
        // The directory the application uses to store the Core Data store file. This code uses a directory named "com.shrikar.SimplyBarcode" in the application's documents Application Support directory.
        let urls = NSFileManager.defaultManager().URLsForDirectory(.DocumentDirectory, inDomains: .UserDomainMask)
        return urls\[urls.count-1\] as NSURL
        }()

    lazy var managedObjectModel: NSManagedObjectModel = {
        // The managed object model for the application. This property is not optional. It is a fatal error for the application not to be able to find and load its model.
        let modelURL = NSBundle.mainBundle().URLForResource("SimplyBarcode", withExtension: "momd")!
        return NSManagedObjectModel(contentsOfURL: modelURL)!
        }()

    lazy var persistentStoreCoordinator: NSPersistentStoreCoordinator? = {
        // The persistent store coordinator for the application. This implementation creates and return a coordinator, having added the store for the application to it. This property is optional since there are legitimate error conditions that could cause the creation of the store to fail.
        // Create the coordinator and store
        var coordinator: NSPersistentStoreCoordinator? = NSPersistentStoreCoordinator(managedObjectModel: self.managedObjectModel)
        let url = self.applicationDocumentsDirectory.URLByAppendingPathComponent("SimplyBarcode.sqlite")
        var error: NSError? = nil
        var failureReason = "There was an error creating or loading the application's saved data."
        if coordinator!.addPersistentStoreWithType(NSSQLiteStoreType, configuration: nil, URL: url, options: nil, error: &error) == nil {
            coordinator = nil
            // Report any error we got.
            let dict = NSMutableDictionary()
            dict\[NSLocalizedDescriptionKey\] = "Failed to initialize the application's saved data"
            dict\[NSLocalizedFailureReasonErrorKey\] = failureReason
            dict\[NSUnderlyingErrorKey\] = error
            error = NSError(domain: "YOUR\_ERROR\_DOMAIN", code: 9999, userInfo: dict)
            // Replace this with code to handle the error appropriately.
            // abort() causes the application to generate a crash log and terminate. You should not use this function in a shipping application, although it may be useful during development.
            NSLog("Unresolved error \\(error), \\(error!.userInfo)")
            abort()
        }

        return coordinator
        }()

    func insertInventory(productName : String, supplierName : String, quantity: Int, cost: Double, barcodeString: String,
        barcode: NSData) {
            let record = NSEntityDescription.insertNewObjectForEntityForName("Product", inManagedObjectContext: self.managedObjectContext!) as Product
            record.productName = productName
            record.supplierName = supplierName
            record.quantity = quantity
            record.cost = cost
            record.barcodeString = barcodeString
            record.barcode = barcode
            saveContext()
    }

    lazy var managedObjectContext: NSManagedObjectContext? = {
        // Returns the managed object context for the application (which is already bound to the persistent store coordinator for the application.) This property is optional since there are legitimate error conditions that could cause the creation of the context to fail.
        let coordinator = self.persistentStoreCoordinator
        if coordinator == nil {
            return nil
        }
        var managedObjectContext = NSManagedObjectContext()
        managedObjectContext.persistentStoreCoordinator = coordinator
        return managedObjectContext
        }()

    // MARK: - Core Data Saving support

    func saveContext () {
        if let moc = self.managedObjectContext {
            var error: NSError? = nil
            if moc.hasChanges && !moc.save(&error) {
                // Replace this implementation with code to handle the error appropriately.
                // abort() causes the application to generate a crash log and terminate. You should not use this function in a shipping application, although it may be useful during development.
                NSLog("Unresolved error \\(error), \\(error!.userInfo)")
                abort()
            }
        }
    }

}
Lets go ahead and customize the table view controller which will display all the inventory. To get started customize and add UILabel to make the cell designed like below.
<Image alt="Core Data" objectFit="cover" src="/static/images/cds4.png" height={350} width={1000} placeholder="blur" quality={100} />
Create a new TableViewCell.Swift class which subclasses UITableViewCell.
import UIKit

class TableViewCell: UITableViewCell {

    @IBOutlet weak var quantity: UILabel!
    @IBOutlet weak var cost: UILabel!
    @IBOutlet weak var supplierName: UILabel!
    @IBOutlet weak var productName: UILabel!
    override func awakeFromNib() {
        super.awakeFromNib()
    }

    override func setSelected(selected: Bool, animated: Bool) {
        super.setSelected(selected, animated: animated)
    }

}
We will be using pod 'RSBarcodes', '~> 0.1' to create barcode in barcode 128 format.
<Image alt="Core Data" objectFit="cover" src="/static/images/cds2.png" height={350} width={1000} placeholder="blur" quality={100} />
Lets create a new file which subclasses UIViewController and call it AddInventoryViewController. Also drag a UIViewController onto the Storyboard and setup the text fields for product name, supplier etc. Also drag the tap gesture recognizer from the object library onto the viewController and create a IBAction to handle tap event.
We will use the name from the textfield to create the barcode and set it as the barcode image.
import UIKit

class AddInventoryViewController: UIViewController {

    @IBOutlet weak var productName: UITextField!
    @IBOutlet weak var supplierName: UITextField!

    @IBOutlet weak var quantity: UITextField!

    @IBOutlet weak var cost: UITextField!
    @IBOutlet weak var barcodeImageView: UIImageView!

    override func viewDidLoad() {
        super.viewDidLoad()

        // Do any additional setup after loading the view.
    }

    override func didReceiveMemoryWarning() {
        super.didReceiveMemoryWarning()
        // Dispose of any resources that can be recreated.
    }

    @IBAction func tapped(sender: AnyObject) {
        self.productName.resignFirstResponder()
        self.supplierName.resignFirstResponder()
        self.quantity.resignFirstResponder()
    }
    @IBAction func previewBarcode(sender: AnyObject) {
        let data = RSUnifiedCodeGenerator().genCodeWithContents(productName.text, machineReadableCodeObjectType: AVMetadataObjectTypeCode128Code)
        self.barcodeImageView.image = data
    }

    @IBAction func cancelPressed(sender: AnyObject) {
        self.dismissViewControllerAnimated(true, completion: nil)
    }

    @IBAction func savePressed(sender: AnyObject) {
        let data = UIImageJPEGRepresentation(self.barcodeImageView.image, 0.90)
        coreDataStack.insertInventory(self.productName.text!, supplierName: self.supplierName.text!, quantity: self.quantity.text.toInt()!, cost: (self.cost.text as NSString).doubleValue, barcodeString: self.productName.text!, barcode: data)
        self.dismissViewControllerAnimated(true, completion: nil)
    }
}
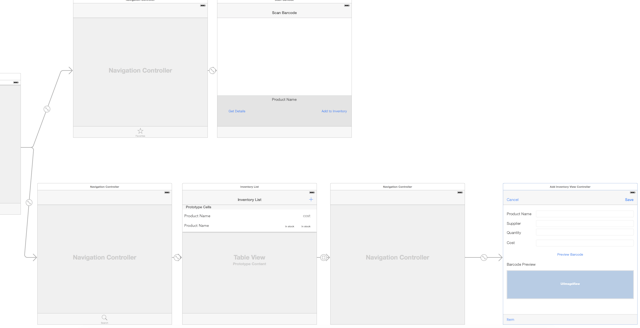
If you have followed along this is how the final storyboard should look like.
<Image alt="Core Data" objectFit="cover" src="/static/images/cds1.png" height={350} width={1000} placeholder="blur" quality={100} />
Finally once you have added the functionality to create a new entry lets go ahead and implement the listing functionality. There is nothing fancy in the viewcontroller . It uses the NSFetchedResultsController which integrates very well with table view. Create the NSFetchRequest and NSFetchedResultsController and provide the data returned by NSFetchedResultsController in the cellForRowAtIndexPath and numberOfRowsInSection methods.
//
//  InventoryViewController.swift
//  SimplyBarcode
//
//  Created by Shrikar Archak on 2/8/15.
//  Copyright (c) 2015 Shrikar Archak. All rights reserved.
//

import UIKit
import CoreData

let coreDataStack = CoreDataStack()

class InventoryViewController: UITableViewController, NSFetchedResultsControllerDelegate {

    var fetchedResultsController: NSFetchedResultsController {
        if \_fetchedResultsController != nil {
            return \_fetchedResultsController!
        }

        let fRequest = fetchRequest()

        let aFetchedResultsController = NSFetchedResultsController(fetchRequest: fRequest, managedObjectContext: coreDataStack.managedObjectContext!, sectionNameKeyPath: nil, cacheName: nil)

        aFetchedResultsController.delegate = self
        \_fetchedResultsController = aFetchedResultsController

        var error: NSError? = nil
        if !\_fetchedResultsController!.performFetch(&error) {
        }

        return \_fetchedResultsController!
    }

    var \_fetchedResultsController: NSFetchedResultsController? = nil

    func fetchRequest() -> NSFetchRequest {
        let fetchRequest = NSFetchRequest(entityName: "Product")

        // Set the batch size to a suitable number.
        fetchRequest.fetchBatchSize = 20

        // Edit the sort key as appropriate.
        let sortDescriptor = NSSortDescriptor(key: "supplierName", ascending: false)

        fetchRequest.sortDescriptors = \[sortDescriptor\]
        return fetchRequest
    }

    override func viewDidLoad() {
        super.viewDidLoad()
        fetchedResultsController.performFetch(nil)

    }

    func controllerDidChangeContent(controller: NSFetchedResultsController) {
        self.tableView.reloadData()
    }

    override func didReceiveMemoryWarning() {
        super.didReceiveMemoryWarning()
        // Dispose of any resources that can be recreated.
    }

    // MARK: - Table view data source

    override func numberOfSectionsInTableView(tableView: UITableView) -> Int {
        return 1
    }

    override func tableView(tableView: UITableView, numberOfRowsInSection section: Int) -> Int {
        let products = self.fetchedResultsController.fetchedObjects as \[Product\]
        return products.count
    }

    override func tableView(tableView: UITableView, cellForRowAtIndexPath indexPath: NSIndexPath) -> UITableViewCell {
        let cell = tableView.dequeueReusableCellWithIdentifier("Cell", forIndexPath: indexPath) as TableViewCell
        let product = self.fetchedResultsController.objectAtIndexPath(indexPath) as Product
        cell.productName.text = product.productName
        cell.supplierName.text = product.supplierName
        cell.cost.text = "$ \\(product.cost)"
        cell.quantity.text = "\\(product.quantity)"
        println(product.cost)
        return cell
    }

}
At this point you should be able to create new products in the inventory and use the scanner to get details about that product.